aShion
Notes aShion
Notes |
|
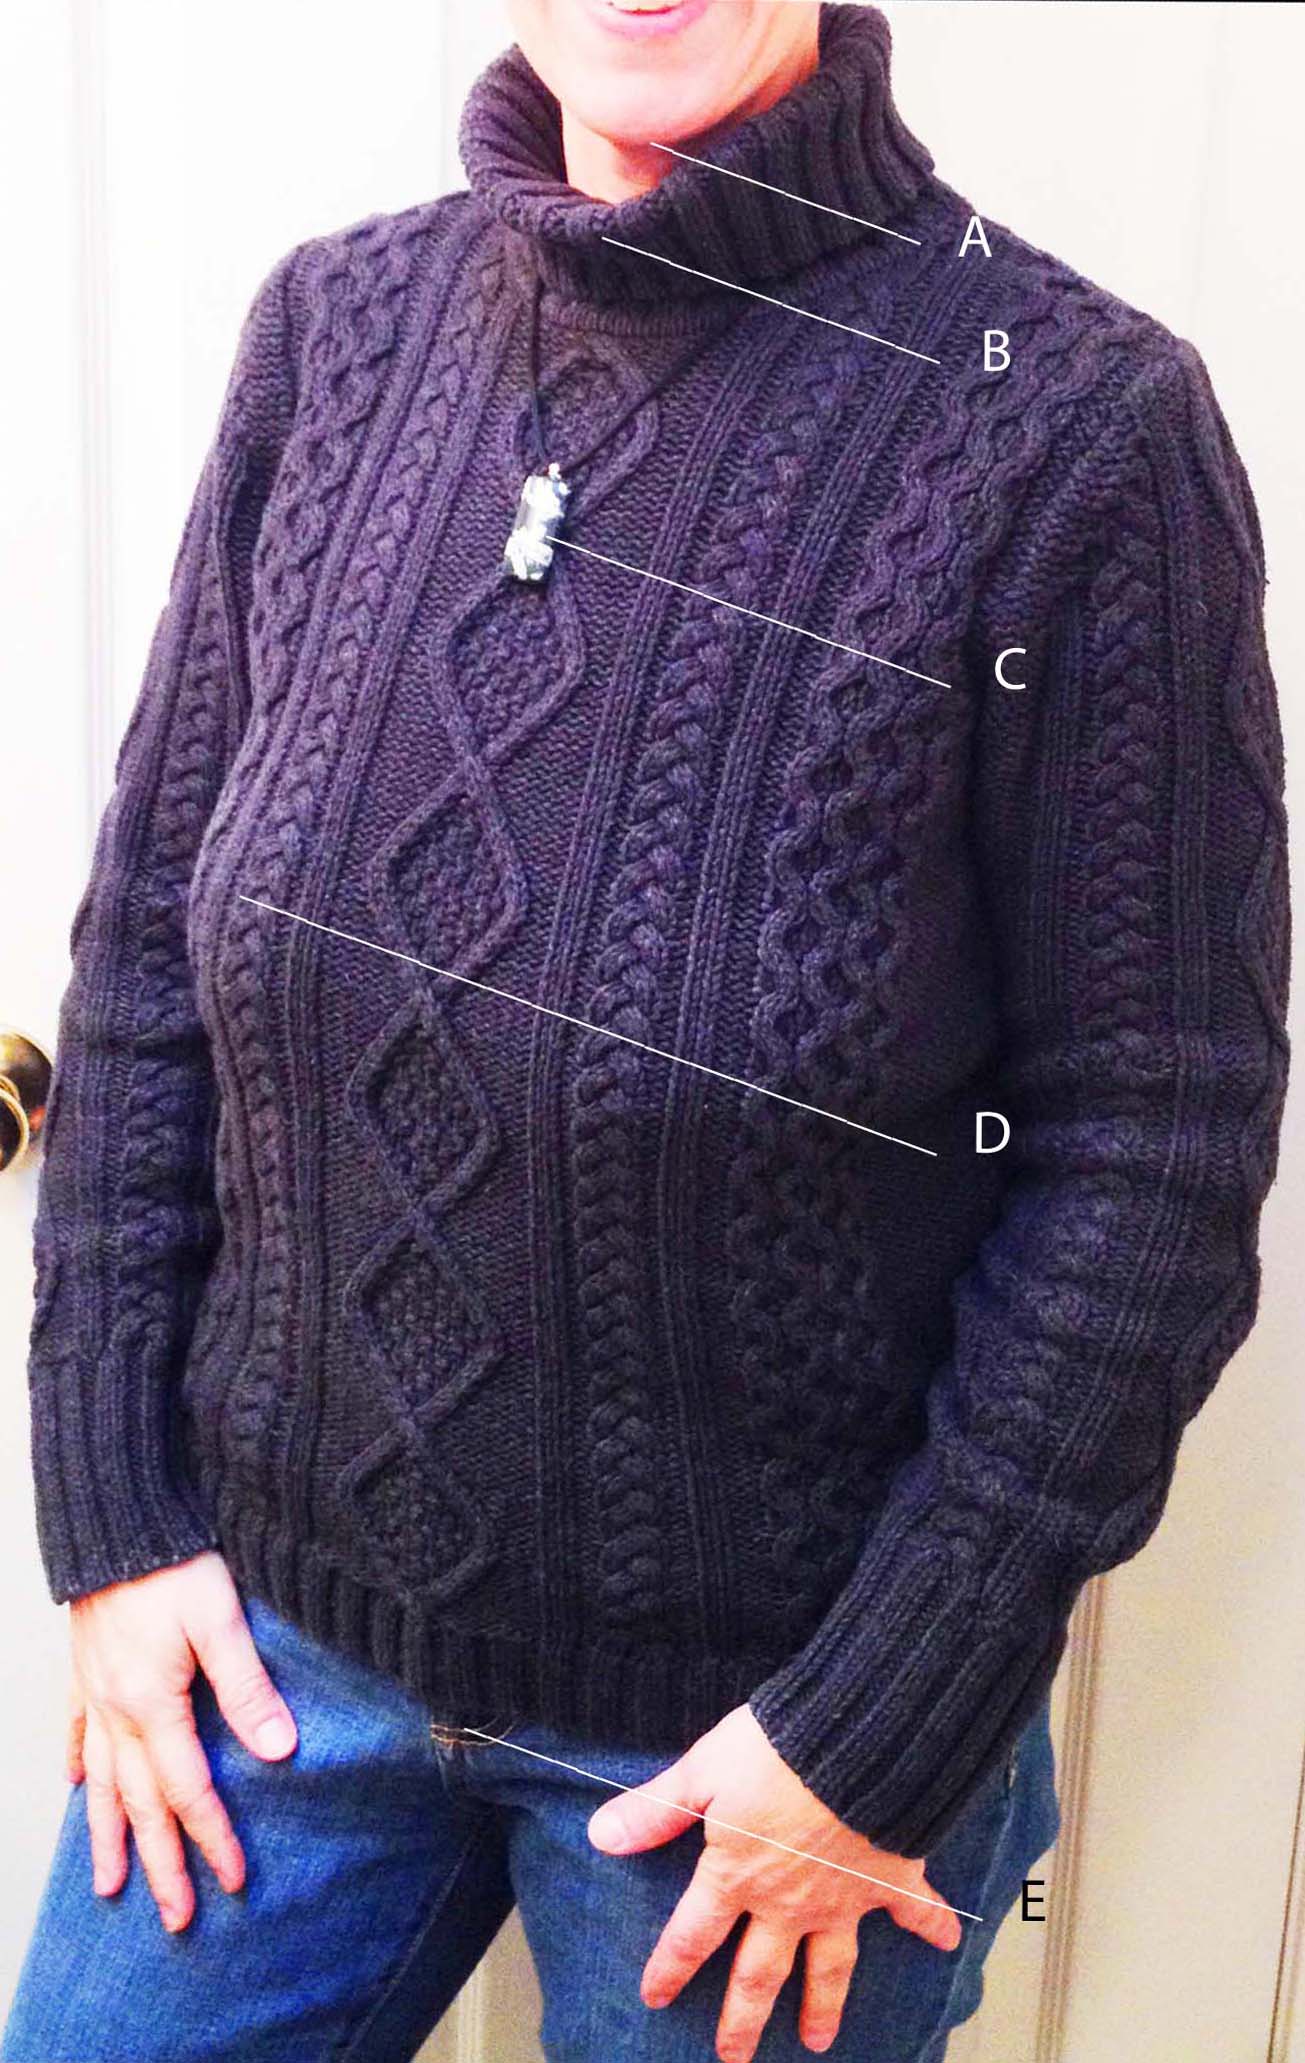
When a woman makes the decision to remove her bra, she is very conscious of the fact that her breasts will no longer be held as high as they were when artificially supported. Until she acclimates to her new, natural profile, it is likely she will be her own harshest critic regarding her fashion presence. A common initial realization is that her present wardrobe no longer “fits” her. In fact, what previously may have been her favorite “go to” items of clothing may now, without the use of a bra, telegraph to others the very fact that her breasts are no longer restricted and suffering. So how, then, can a woman attire herself successfully to accomplish the equally important goals of breast health, comfort, and attractive presentation? Visual Trickery The art of successfully dressing for bra-free living can be summed up in two words: Visual Trickery. Because most women wear a bra, our eyes are trained to expect to see the bust line at a certain vertical location on the chest. If you remove your bra and your bustline is lowered as a result, there are several creative tricks you can employ to essentially fool the eye into “seeing” the bust line as appearing higher than it actually is. First, however, we must understand a bit about proportions and how the brain analyzes and interprets the messages it receives from the eyes. The Zones of Proportion – A Definition Take a look at the following image, upon which five lines have been drawn to represent various Zones. Separately, each Zone constitutes a proportion of the bigger picture. Observed by others, it is the relationship of these various proportions to each other which will be analyzed by the brain and subsequently interpreted as either being out of balance or in balance and, therefore, “pleasing”. Successful bra-free dressing is achieved when you make the bust line appear to be in a higher Zone – nearer to the face, where we commonly “expect” to see the bust line – rather than a lower Zone.
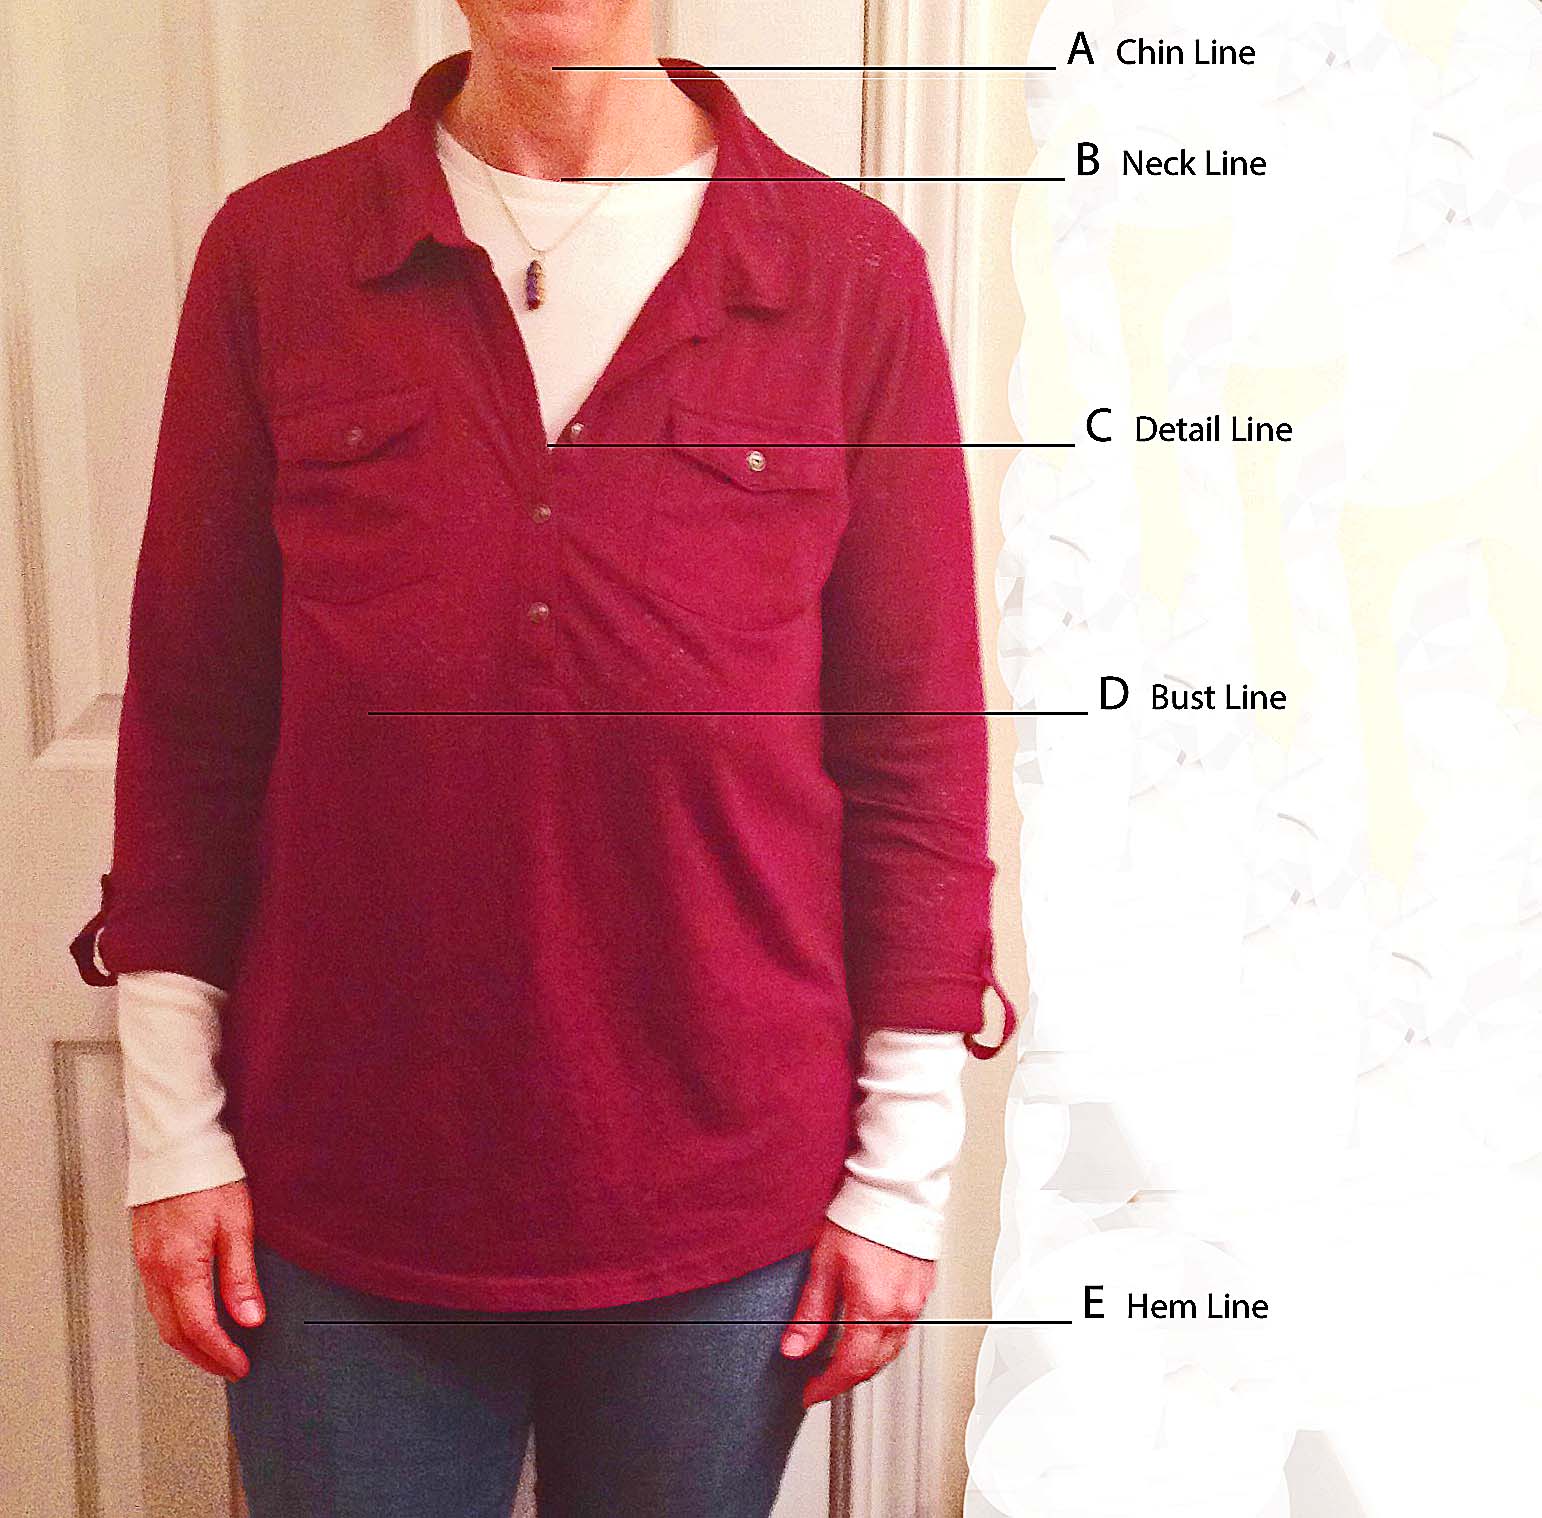
Line B – The Neck Line - This is a primary feature which exerts significant influence on how the eye interprets the vertical position of the Bust Line. In most cases, the Neck Line represents the neckline of the garment(s) being worn. Zone A-B constitutes that part of the neck (which may sometimes extend to also include the upper chest) that usually is exposed skin. Line C – The Detail Line - This is a secondary feature. In this particular image, the detail that is dominant to the eye is the neckline of the red over-shirt. If the white under-shirt were not being worn, the necklace would likely represent Line C and the red over-shirt neckline would function as Line B. (Note: It is possible for 'C' line to be either above or below the 'B' line.) Line D – The Bust Line - This is a fixed point, the vertical position of which can only be raised by the use of artificial support (a bra). Line E – The Hem Line - The lowest part of the red over-shirt. In some cases, the shirtsleeve cuff may serve as the “hem” if the shirt is tucked into the pants at the waist. Study these lines and the various Zones they visually create. When you are first transitioning into bra-free dressing, you may find it very helpful to study your own proportions and Zones in a similar manner. Simply dress in a bra-free selection or combination and have a partner or good friend take several photographs of you. Alternately, you can use a camera on a tripod with a timer or remote shutter. It is best not to take a “selfie”, as your garment will not hang correctly on your body for you to analyze proportions in a meaningful way. After you have printed out your photographs on paper, take a ruler and a pencil and draw the five horizontal Lines A-E right on your image, just as we have in this example. You may wish to take several such photographs, using different wardrobe selections, to analyze which options best accomplish your goal of visually lifting your bust line without the use of a bra. As a bonus, you may find as you go through this exercise that your partner is becoming more interested in what you’re doing, gaining you the much-needed emotional support to assist you with this important and life-enhancing choice. Interpreting and Accentuating the Zones Now, let’s really study the Zones defined by each of the Lines A-E, paying particular attention to the vertical distance between each of the lines A-E. Keep in mind this rule: If your bust line has been lowered due to removing the artificial support of a bra, then a compensatory action can be taken to give the appearance that your bust line is closer to your face (where our brain “expects” your bust line to be). When you look at a person, your attention is generally focused on their face, a Zone which typically includes visual cues like jewelry, a neckline, and in the case of a woman... her bust line – this is what constitutes the “portrait” of the person in our mind’s eye.
Imagine that the red over-shirt were completely buttoned up, totally obscuring the white undershirt. That basically removes the ‘C’ Detail Line. Can you see how doing so would significantly increase the vertical distance in the B-D Zone, thus making the bust line appear to be quite low? Think about that, as this may allow you to truly appreciate what role the ‘C’ Detail Line plays in enhancing this ensemble. Eliminating the C Line detail makes the B-D zone the same size as the D-E zone which makes the bustline appear lower. Now, look at the image even more closely. What modifications might you suggest to visually raise the ‘D’ Bust Line and make it appear to be higher? Think for a moment, and then I'll share a few suggestions:
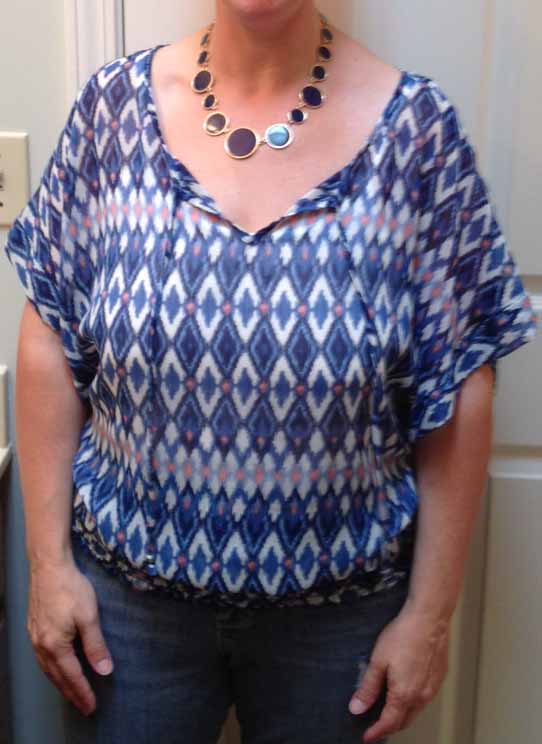
Case Study: Real-Life Application & Examples NOTE: All images are of the same model, and she is not wearing a bra or under-garment in any of the images. IMAGE ONE: In this image, you can see that the B-D Zone is larger than the D-E Zone. Having this much “real estate” above the bust line creates the undesired effect of having it appear very low on the chest. We cannot move A, and we cannot move D, so a better choice would be to either choose a lower neckline or increase the C detail impact, and possibly lower it as well. A larger fob on the necklace, and lowering it another 2-3 inches, would break up the large area above the bust line, while adding detail to attract attention away from the bust line. That would allow the eye to group together the bust line, the C detail, and the collar, thereby making the bust line appear higher. In the case of this example, this sweater was selected due to living in a cold climate, but generally if it is warm enough, a turtleneck collar like this will make it difficult to convince the eye that the bust line is higher than it is. The interesting detail on the front of the sweater helps to create distraction. A smooth sweater would not be a good choice. Note: A camisole can be worn under this or any blouse or sweater for warmth and to help conceal nipple erections.
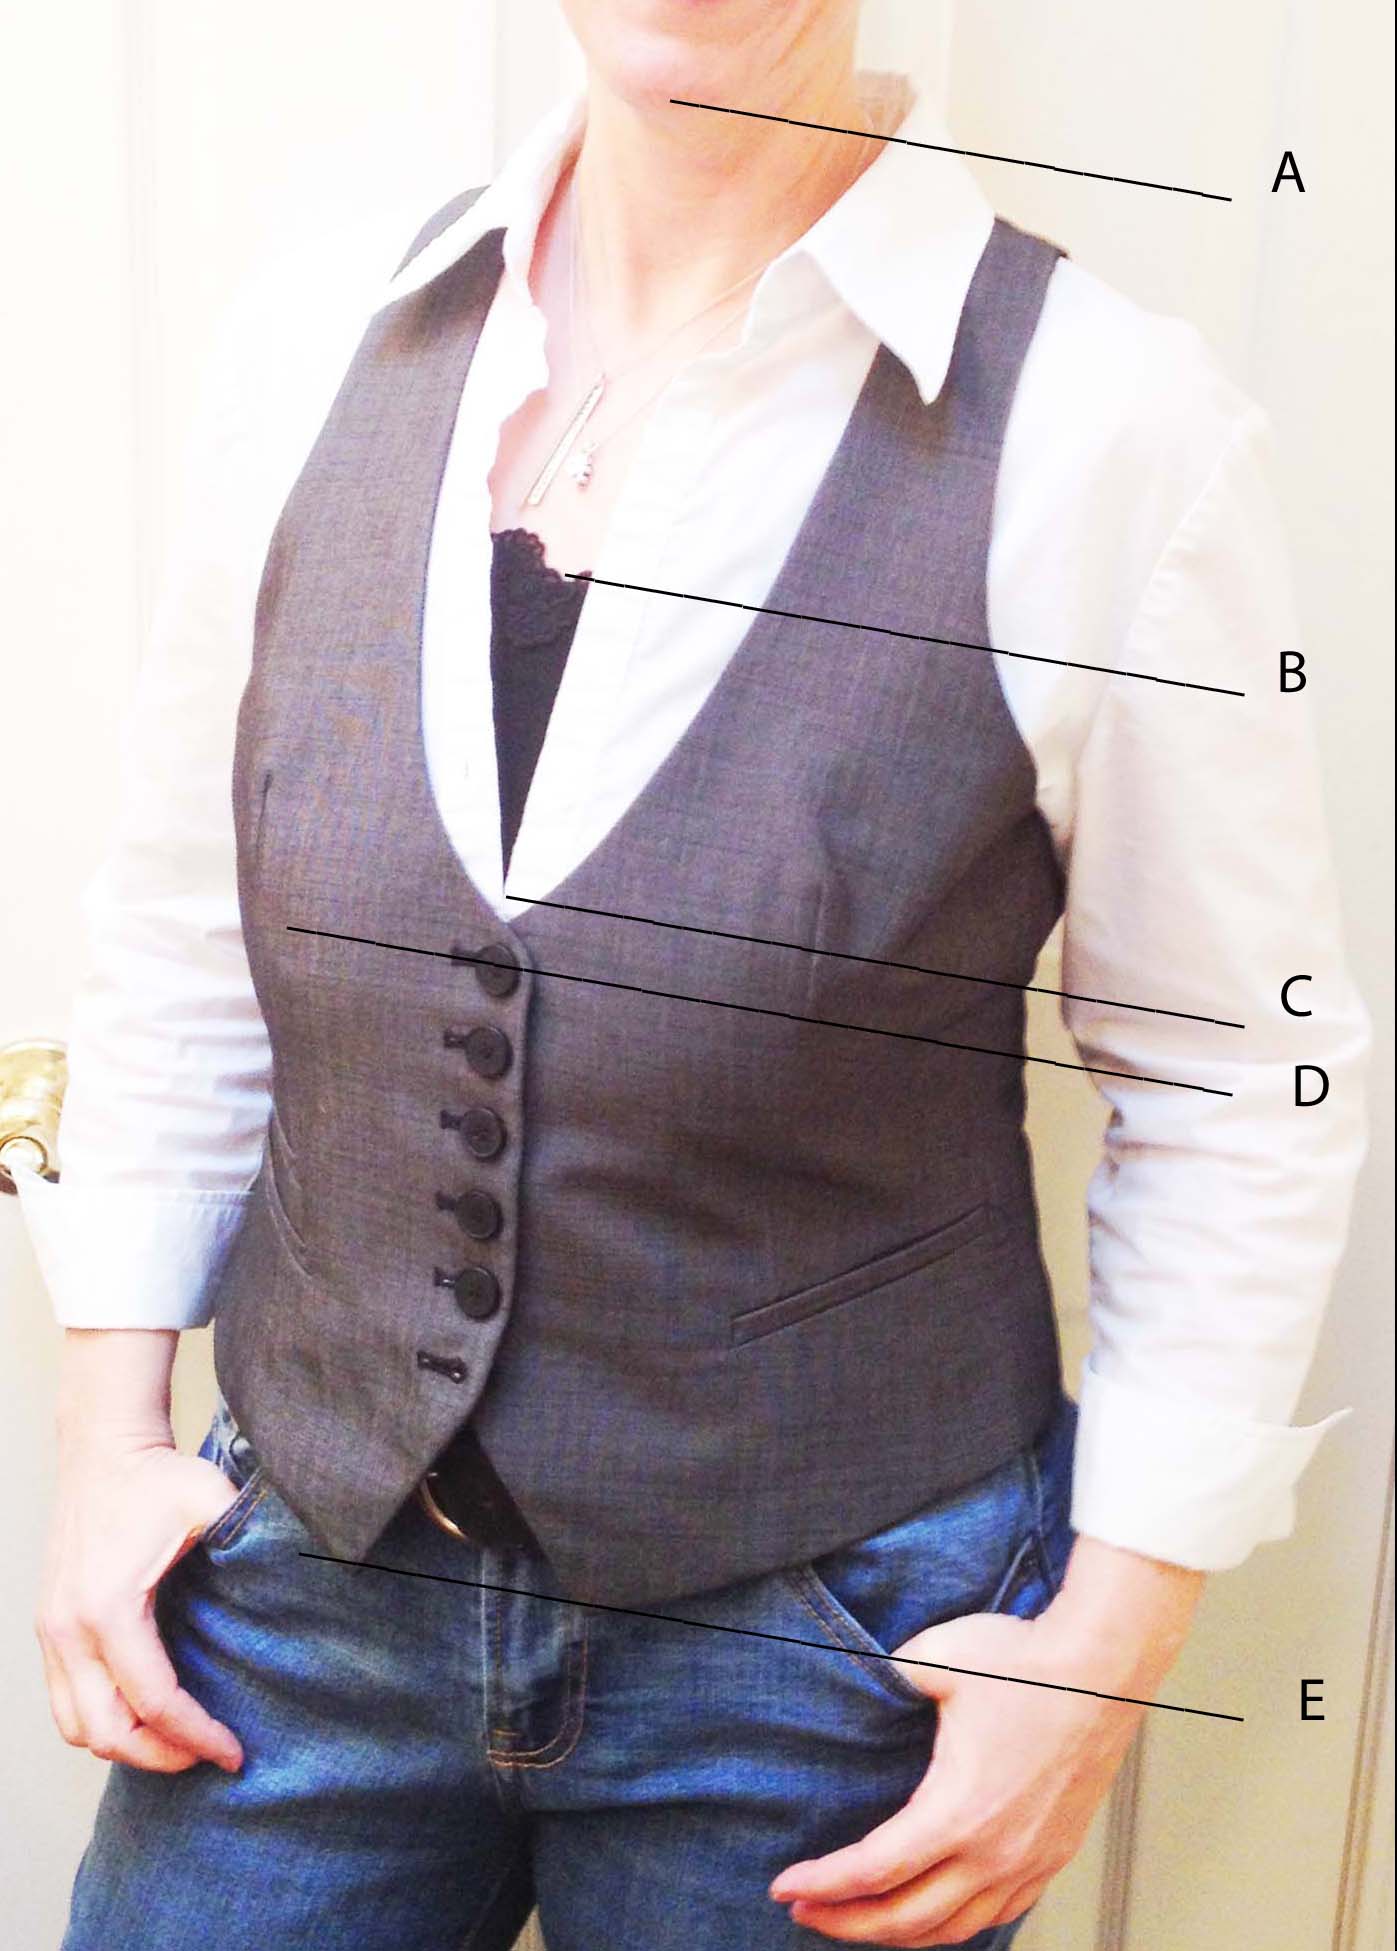
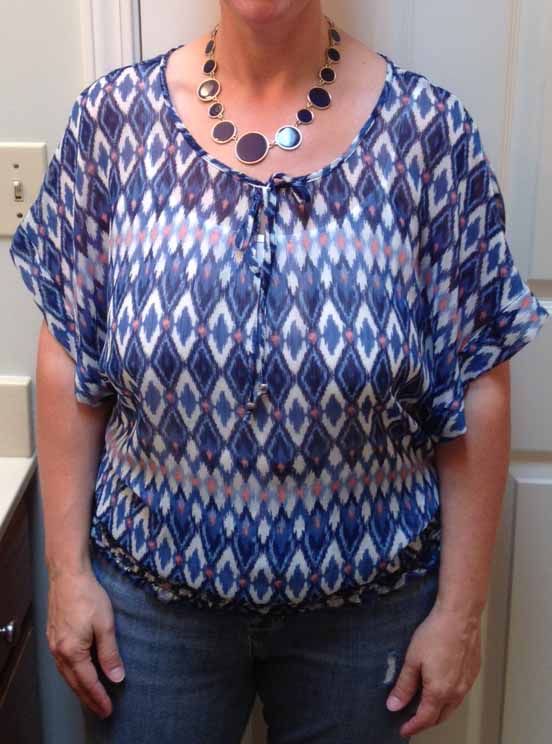
IMAGE TWO: In this image her camisole is seen and it becomes the neckline. Note that the B-D Zone is half the size of the D-E Zone, which is great. The A-B zone is larger than the B-D zone which is also very good. TThe A-C zone is almost the same size as the A-D zone. All three of these visually lift the bust line. Scroll to compare these three images. Can you see the difference that the three fashion choices make for this lady? Special consideration: Use care wearing any garment which has darts sewn into the bust area. As you can see here, this vest (a piece from her existing wardrobe) does have darts, which tend to suggest that the breasts are lower than they “should” be. Although in this case the vest works, possibly because the neck line feature is so dominant as to draw attention from the darts, I would encourage you to avoid darts in your blouse and top selections whenever possible.
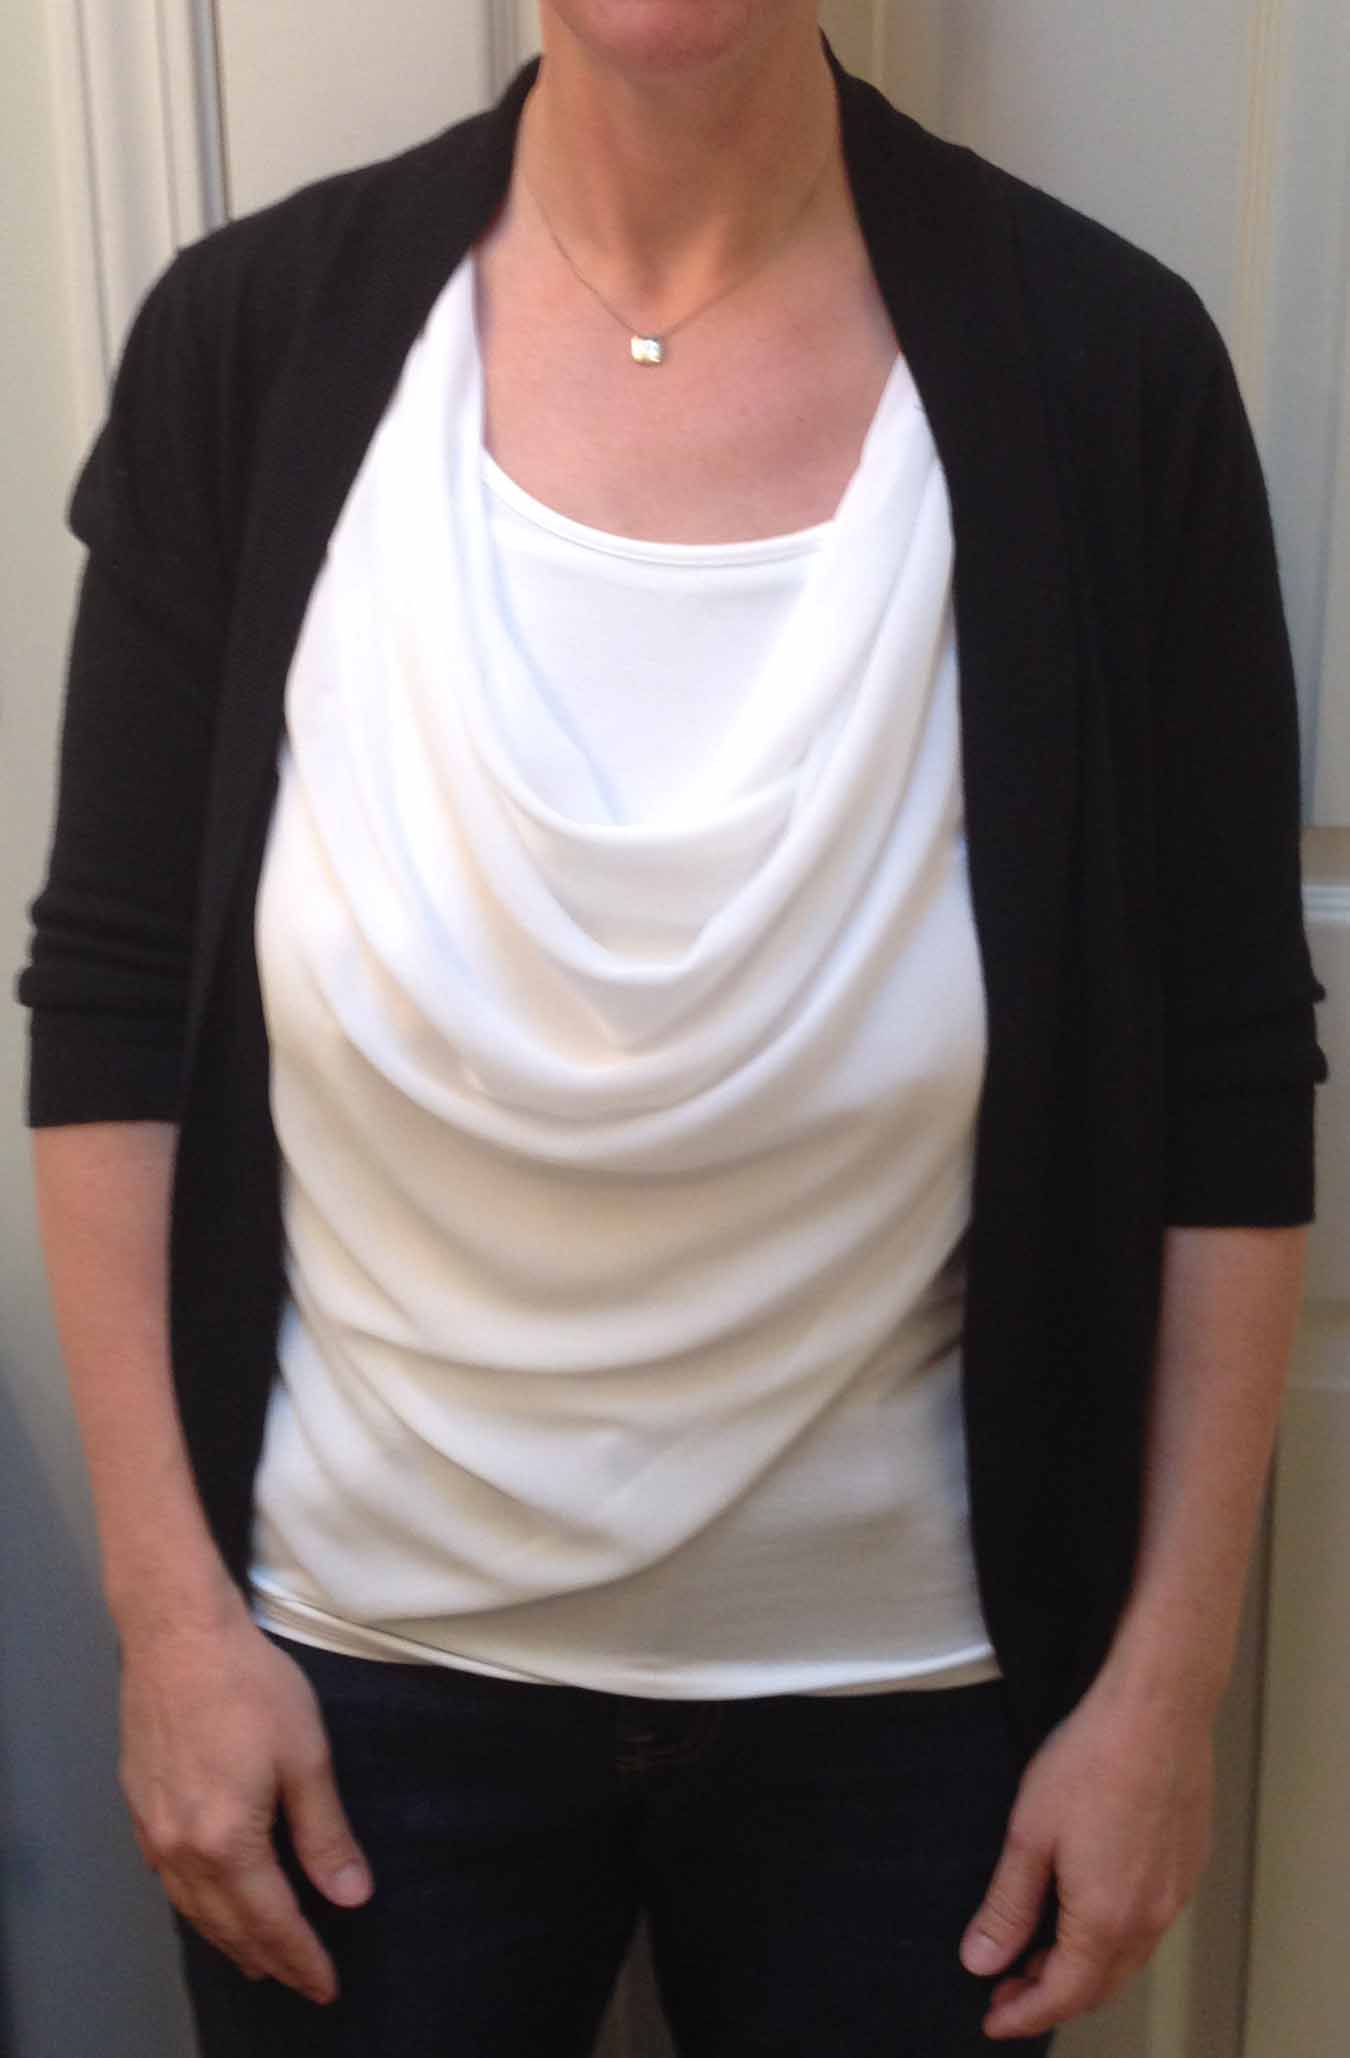
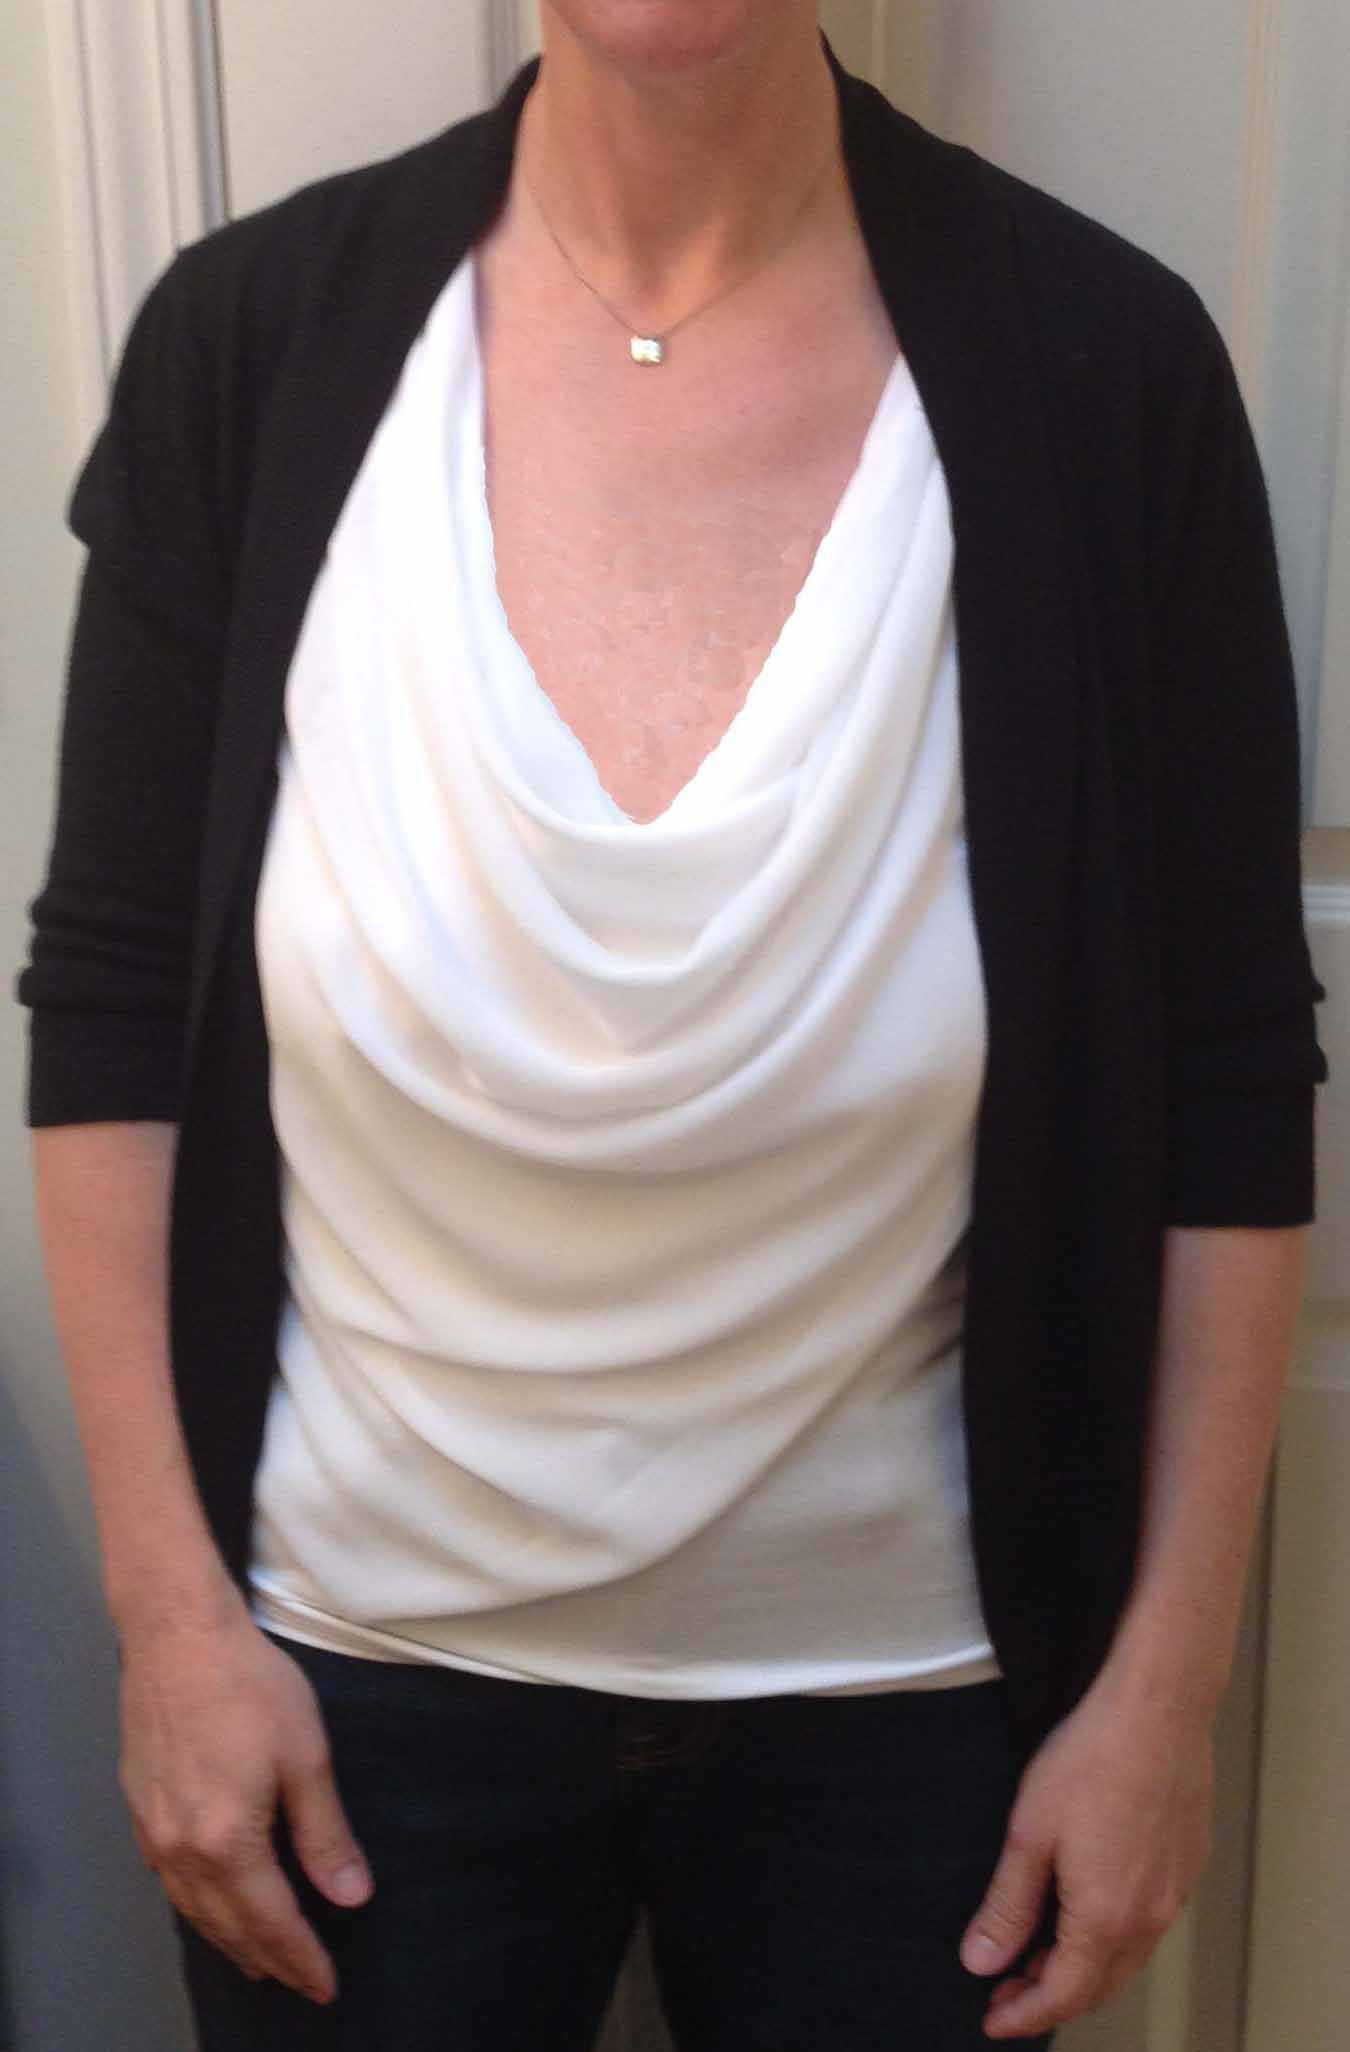
IMAGE THREE: This image shows a variation on the combination used in IMAGE TWO, where the A, B, C and D lines are very similar, but the E line is different. With the shirt tucked in at the waist, it is much shorter, thereby decreasing the D-E zone and causing the bust line to look lower. However, in this case, the eyes tend to interpret the sleeve length as the ‘E’ Hem Line. Therefore the D-E zone is still similar to the one in the image above. This image demonstrates that some interesting variations can be done with basic fashion components to increase the versatility of an existing wardrobe. Weather permitting, a deeper-cut neckline can generally assist in visually lifting the bust line. If that is not to your taste, using an over-blouse that is open at least to the ‘D’ Bust Line can achieve a similar effect. This 'B' Neck Line is somewhat conservative while the visual neckline (or the C-detail, in this instance) is effective. The white camisole against her light-colored skin helps to further perpetuate the illusion. Do you know why I have identified the plaid over-blouse neck line as the C-detail instead of the necklace fob? In this instance, the lower neckline of the plaid over-shirt is the relatively dominant feature. As you apply these guidelines, you may find your necklace to be the more dominant feature, making it your ‘C’ Detail Line. Each situation and ensemble is different, and you should have fun experimenting to see which you feel best achieves your goal to visually lift your bust line. Below is an example of the effectiveness of a lowered neckline ('B' line). The photo on the left is the original outfit. She is wearing a drape-front top with a camisole to close in the low neckline for the sake of modesty. In the second photo, the camisole has been removed with PhotoShop and you can see by looking at the two images, which one appears to have a higher bustline.
Don’t Try to “Hide” An important thing to remember – and a mis-step that some women new to bra freedom may consciously or unconsciously make – is that you should not attempt to hide your breasts. Although it seems counterintuitive, the truth is that trying to hide something only makes whatever you’re trying to hide seem more obvious. Trying to hide does not look natural, and in being bra-free, you want to look, feel, and BE as natural as possible – that’s why you took the bra off in the first place. The key concept is to draw attention away from where your breasts are in relation to the rest of your body in such a way that others cannot so easily perceive that you are bra-free. Soon, you will accept that being bra-free is not only okay, it is, in fact, your natural state. After that, successful bra-free dressing will become much easier and more enjoyable.
Now what? Next Steps. Most women who have gained a little experience with dressing to de-emphasize their breast movement become much more comfortable with their own bodies over time and are not quite as apprehensive about being bra-free. They no longer feel as if they’re doing something ‘wrong’ or something that is against what they were raised to believe is more 'proper'. I hope that you will soon gain that extra freedom, as well.
Build Your 'Basic Ten' Outfits As you begin to see how your things go together to form "outfits", you will find that certain combinations work well for you. If you get a complement... That's A Keeper! To make it easier getting dressed in the mornings, put together several complete outfits on hangers and put them on one end of your closet pole. That will make getting dressed easier. The only decision is which of the two or three outfits you will wear. Do this until you have your 'Basic Ten' outfits that you like. Now you can 'fine tune' these outfits and by changing the bottoms (skirt, pants, shorts... or different colors and patterns), or changing the cami or sweater under the over-blouse or over-shirt, or changing the jewelry, or changing the over-sweater, you can expand each outfit into several different combinations. Ten outfits can be modified and you will not wear the same outfit once in a whole month. Here we see the same outfit in three different ways: The second one adds an over-sweater that changes her profile somewhat, and makes the combination different. The third image shows how raising the neckline of the blouse effectively lowers her bustline (her D-Line).
Share your success with me or with others: If you are interested in taking some images of your fashion selections for assessment, I am willing to share with you my impressions of how your selection accomplishes your goal, as well as offer enhancements for your consideration, to further your success. I am also interested in learning why you like the selection you made and what positive attributes you feel it contributes to meeting your goal. We have established an Image Gallery here on BreastNotes.com, (also in this section) that showcases successful bra-free wardrobe selections our readers have constructed to help them become comfortable, confident, and healthy, whether at work or relaxing. Please consider sharing your own images, to encourage other readers who are interested in dressing to improve their breast health. Your successful images will indicate that it is indeed possible to dress well and confidently while being bra-free.
|
|||||||||
 Line
A – The Chin Line - This is a fixed point and does not
change.
Line
A – The Chin Line - This is a fixed point and does not
change.